


CorelDraw product expert Roger Wambolt with a special thank you to David Milisock of Custom Graphic Technologies for his technical expertise and support provides useful tips on creating print ready files for wide-format output.
No matter how eye-catching a design, getting it to a print ready file stage can be a headache for a PSP, but tools like CorelDraw Graphics Suite can make life easier. Here’s how.
1. File complexity
Complex vector graphics can be more challenging to print, right. But, with a little foresight, it’s simple to avoid issues like limit check errors and excessive Rip times. Here are a few things to look for to get the best and fastest results.
Be sure the designer has not hidden complex graphics behind other objects. If the file
includes hidden objects, PostScript will still send them through the Rip and will then cover them, causing longer Rip times and larger spool files.
Use as few nodes as possible in a vector graphic. Since the tiniest details may not even be noticeable on the final output, remove that detail beforehand to save Rip time.
Look for multiple lenses or transparencies placed on top of each other or on top of a single bitmap or drop shadow. To simplify your file, convert the resulting object to a bitmap at output resolution and vastly improve printing time and reduce spool size.
If you are using many fountain fills on small objects, consider reducing the number of steps to reduce Rip time. For smaller objects, you can often use fewer steps to achieve the same look. For larger objects, use CorelDraw's ‘optimize fountain fill’ feature, found on the PostScript tab in the print dialogue box.
Try not to embed multiple EPS files within an EPS file. It is far more efficient to have one EPS of native objects rather than a nest of embedded EPS files. PostScript must save and restore every time it encounters an embedded EPS. Too many levels of embedded EPS files will exceed set PostScript limits and can cause errors.
Set the rendering resolution of the document to the resolution that you will be using for output. By default it is set to 300dpi, but most wide-format printing jobs only require 150dpi.
2. Bitmaps
Since there is a physical limit to what detail can be viewed at different resolutions, excessively large bitmaps are both unnecessary and inefficient in terms of output and saved file sizes. It’s easy to check if the bitmap in your file is larger than needed. In CorelDraw check the ‘property’ bar. If the resolution is higher than required, go to the bitmap menu and use ‘resample’ to change the file to the needed resolution. If the resolution of the image is too low, CorelDraw Graphics Suite ships with the PhotoZoom plug-in making it simple to upsample your file. Here are some other useful tips:
If your file is too large, you can also crop the bitmap to the specific area that will be displayed in Photo-Paint and then import it into CorelDraw (or crop it directly in CorelDraw) to eliminate any extra info in the file that you don’t need. Be sure not to try to make it smaller using the sizing handles. Doing this effectively increases the resolution of the bitmap. If this has already been done, select it and then from the bitmap menu, select ‘convert to bitmap’ and set the desired resolution and colour mode. This will reduce the image’s size both in memory and in the Rip.
Remember that bitmap resolution can typically be 100-150dpi for inkjet devices to deliver photo quality. Increasing the dpi won’t change the quality of the output, but it will give you increased Rip times and file sizes. This also applies to texture fills.
3. Fonts
Fonts are often downloaded to the output device, taking up precious space and Rip time. Before sending the job out, consider converting text to curves. Also keep in mind:
Avoid using many different fonts and instead use various sizes of just a few fonts so that the PostScript does not contain a lot of font information. As an added bonus, this usually offers a better design aesthetic too.
Clients should be asked to embed fonts in the .CDR file if they are not sure if the printer has them already.
Avoid using outlines on fonts since they are Rip intensive.
4. Colour management
Seasoned designers and print professionals know that there are colours that look nice, and then there are colours that print nice. This has little to do with efficient file size or Rip times and everything to do with getting what you expect from a file.
Use the CMYK colour model when designing for print RGB, Lab, and others have a much larger gamut and require colour conversions to convert to the relatively small CMYK colour space, causing some colour to be lost. To assure predictability, design in the same model that will be used for printing.
Don't misuse spot colours. Spot colours should be used for jobs of less than four-colours, or to enhance a job with a very specific colour for a logo or graphic.
Work with colour simulation of the printer on to avoid colour issues later.
Be sure to select the profile for your specific device. Profiles contain information on the colour capabilities of the specific device you’re working with to give you a more accurate preview of your document.
5. Print troubleshooting
If there are issues printing a file, the first thing to determine is if you are using a PostScript or non-PostScript device. If the printer is non-PostScript, check the video display driver and make sure it is current. (Note: non-PostScript printers are GDI devices driven by the video driver.)
If the driver is up to date, look at the printing options in tools > options > printing > driver compatibility (see figure 1).
If you are using a PostScript printer, you’ll find settings to assist with output in the PostScript tab (see figure 2).
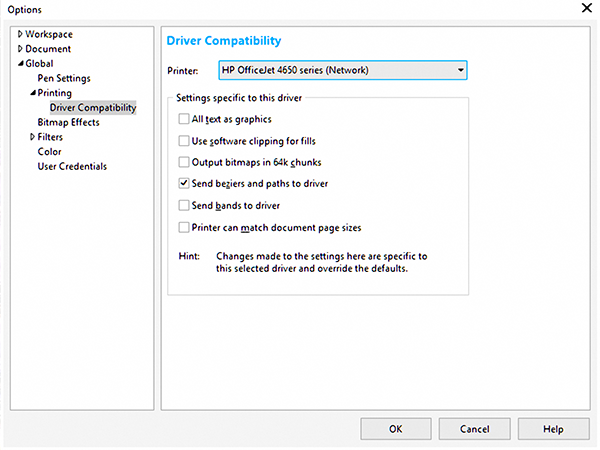
Use the driver compatibility settings within CorelDraw when outputting to a non-PostScript device.
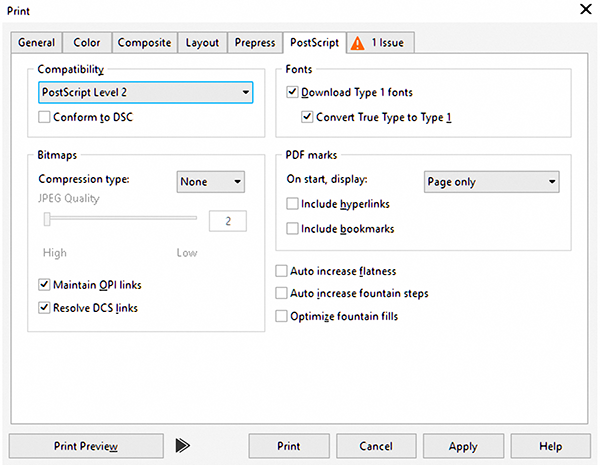
For PostScript settings, look in the PostScript tab within the ‘print’ dialogue box.
If changing the settings does not resolve the issue, look at the file itself. Is there corruption in the file and if so, how do you identify where? Luckily, this process is relatively easy if you use quadrants. Visualise the document segmented into four sections, for example, top left and right and bottom left and right. Select the top left and right and then print selected only. If you get successful output, repeat the process for the bottom left and right. If printing fails, select only the left and print selected. Repeat until you have identified the area of the problem. You can further narrow the area to a specific object or group of objects.